HIGHWAY FAQ
Highway Safety FAQs
What do I do in a driving emergency?
- Pull your vehicle off the main highway as far as possible. If there is a shoulder, use it.
- Turn on your vehicle’s emergency flashers if you have them. If not, leave your headlights on low beam and turn on your right turn signal. Put up the hood of the car. Place first Orion flare at least 20 feet (8 paces) behind your vehicle on the right edge of the main roadway. This will warn oncoming traffic where your vehicle is parked. Walk back up to 100 feet (40 paces) behind the vehicle (while being alert to hazards of oncoming traffic) placing additional flares to create a larger Safety Zone.
- If possible, stay with your vehicle until help comes. This is especially important if you are on an interstate highway. The state patrol monitors major highways with more frequency and a patrol car will be along at regular intervals.
- If you must leave your vehicle, carry a flashlight or an Orion lightstick. Walk on the side of the road or shoulder, facing traffic. Never leave your vehicle and walk on the traveled portion of the highway. Not only is this very dangerous, but it is also illegal!
- Tie a white cloth to the radio antenna or a door handle. Make sure it is clearly visible. Use Orion emergency flares if you have them.
Highway flares, white cloth, and flashers are all distress signals that let law enforcement officers know that you need help. If your vehicle is stopped or parked on the freeway for any other reason than an emergency, officers may ticket you.
Are there cautions/warnings I should be made aware of before buying/using a highway flare?
Yes, highway flares produce a hot flame and there are consequently dangers in lighting and using highway flares if proper precautions are not taken. When used in accordance with instructions and in the manner intended, highway flares are safe and extremely valuable products for protecting life and property. Below are critical factors in the safe and effective use of highway flares.
- Keep out of reach of children.
- Avoid sparks and open flames (to prevent flare ignition).
- For outdoor use on pavement only.
- Activated flare produces a hot flame and may emit sparks or burning liquid ash, such that it must be kept away from spilled fuel, fumes, or combustible materials. Special care should be taken in dry and/or high wind environments to keep flare away from combustible materials.
- Never use highway flares when an increased risk of forest fire/wildfire exists.
- When igniting and afterward, stand with back to the wind and always point flare away from face and body. The flare flame is very hot as is the liquid ash residue which will cause severe burns if contacted with skin or clothing.
- Never carry a highway flare with the burning end above hand (the liquid ash will drip down and burn hand). If carrying lighted flare, the burning tip should be pointed down at the ground and flare should only be carried over paved surface free of combustible materials.
- Follow all lighting instructions printed on the highway flare tube and as delineated in the response to the question below “How do I light an Orion highway flare?”
How do I use highway flares?
Tips for safe and effective flare use include:
- Flares produce a hot flame. As such, never light flares in the presence of spilled flammable, fumes, or combustible materials.
- Never use flares when an increased risk of forest fire/wildfire exists.
- Light the first flare (following the directions under “How do I light an Orion Emergency Flare” below), placing it at least 20 feet (8 paces) behind the vehicle. Normal rain and wind will not affect flare performance, but be sure not to immerse the flame in a puddle of water.
- Light the second flare. Then walk with it on the roadside (not in traffic) holding the flare away from your body with the burning end down (to avoid hot residue), approximately 40 feet (16 paces) behind the first lighted flare. Place the flare on the ground. (Carrying the lit flare will help protect you from oncoming traffic so you are never invisible on the roadside).
- If you are on a two-lane road, place an additional flare at least 15 feet in front of the vehicle to warn traffic passing in the opposite direction. Or alternatively, if you are on a curve or a hill, you may want to place a third flare 100 feet (40 paces) behind the disabled vehicle.
- For longer emergencies, flares may be stacked to provide additional warning time. Place a lighted flare on the ground, then uncap the second flare and place it on the non-burning end of the first flare to form an “L”. The second flare will light automatically as the first flare burns down to double the duration of protection. Additional flares should be carried to provide for long term emergencies and multiple deployments.
Before leaving the scene, make sure that lit flares have burned completely. Never extinguish by stepping on the flare. If the flare must be extinguished, tap burning end on pavement to break flame front from the body of the flare (like separating ash from cigar).
For additional information, see our Orion Safety Flare Deployment & Safety Guide.
Proper Flare Usage FAQs
How do I light an Orion highway flare?
Orion flares are easy and safe to use.
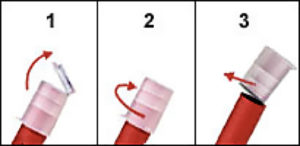
- Remove plastic lid to expose scratch sticker on the cap.
- Twist and remove the cap, exposing the black flare igniter button.
- Gently press the black ignitor button against the scratch sticker on the cap, strike away from your face and body. Aim downward.
Once the flare is ignited, carefully place it on the ground (do not drop). Do not hold the flare in an upright position as molten residue from the combustion process will burn if dripped on your hand. We recommend carefully reading all instructions first.
For additional information, see Orion Safety Flare Deployment & Safety Guide.
What are the mistakes to avoid when using highway flares?
Striking the igniter button with the scratch sticker on the cap too hard.
– This is unnecessary and can cause the prime to “pop” much like a match-head.
Improper positioning of the flare during the ignition process.
– The flare should be held in front of and away from the body and face. Then, even if the prime is struck too hard and pops, the ignited prime will not touch the operator.
Carrying lighted flares with the burning end straight up so that the molten residue drips on the hand of the operator.
–If the flare must be carried while lit, be sure to keep the burning end down towards the ground and make certain any dripping is on pavement and away from combustible materials.
Not “placing” the flare on the ground after ignition, but dropping it.
– This practice can cause the burning portion of the flare to break off, extinguishing the flare.
Trying to extinguish the flare by smothering the flame (stepping on it).
–The flare is designed to produce oxygen independent of the outside air. Flares should be allowed to burn completely, thereby consuming all chemicals within the flare. If the flare must be extinguished, tap burning end on pavement to break flame front from the body of the flare (like separating ash from cigar).
How do I properly store and handle highway flares?
Highway flares are a safe and stable item to store. The U.S. Department of Transportation classifies flares as a flammable solid, but they are not particularly sensitive to initiation. There is no threat of mass explosion, nor is there any threat of an individual flare exploding.
Flares should be stored in a sealed bag, away from flame and heat. Failure to store in a sealed bag will diminish flare performance.
While flares have no expiration date when property stored, storage above 120°F for a long period of time (more than 1 week) should be avoided. The normal recommended storage temperatures are 40 to 90°F.
If flares are stored in damp or humid conditions outside of a sealed bag, performance will be degraded.
Highway Flares And Atmospheric Conditions
How highway flares operate and are tested.
Highway flare composition is a mixture of oxidizers, fuels, and burn rate modifiers. The highway flare formulation is designed to burn at not less than 70 candela (brightness measure) for a specified amount of time (Orion sells 30, 20, 15, 10, and 5-minute flares). To the extent, a flare is only as good as its ability to be seen, burn time and brightness are two of the critical variables being exhaustively checked at various points in the production process. All such testing is conducted at ambient temperature at the elevation of the production facility.
Another significant test involves underwater burning. A lit flare is placed vertically in a bucket of water for a sufficient length of time to allow the ignition compound to burn and transfer the combustion process to the flare composition. The flare must vigorously pass through the “transfer” as this indicates proper formulation and processing. The flare will extinguish when placed horizontally in water (which is why puddles will extinguish flares) but vertical burning underwater shows that sufficient gas is being generated (as a byproduct of combustion) to displace the water away from the flame front.
Effects of atmospheric conditions.
As a pyrotechnic composition designed to produce intense light, highway flares are susceptible to atmospheric conditions and especially moisture. Other factors that affect the burn include elevation, wind, and temperature. Flares are robust enough to burn in cold temperatures, at high elevations, in high wind, and in rain so long as the flare itself is not laying in water. When these variables are working against the combustion process, this can diminish light output (which typically also lengthens the burn time) or, if the conditions become sufficiently extreme, extinguish the flare altogether.
Combinations of cold temperatures, high winds, and rain can conspire to fight the ability of the flare to burn normally. Water is a “heat sink” when it evaporates and if there are enough raindrops, particularly in cold weather, this can lead to a cooling of the burning material until it eventually extinguishes. This is especially true if the flare is laying on the ground as opposed to propped up with a wire stand. Cold ground will pull heat away from the flame front as will wind. When this situation is combined with rain, it creates the most challenging environment for burning and the greatest likelihood for extinguishing the flare.
Flare placement when there is no stand.
While wire stands are highly recommended (see below), if highway flares are to be placed on the ground the following guidelines are recommended:
- The flare should be placed away from any puddles and not within the primary drainage path for water flowing off the roadway (i.e., not in a ditch or gutter).
- The lighted end of the flare should be positioned downwind (you do not want the wind blowing directly in the flame front).
- The lighted end of the flare should be placed downhill (if possible) so that water flowing off the roadway is not being channeled into the tip of the flare.
- In a particularly hard rain, one flare can be propped under another to raise the flare body and the tip of the burning flare off the wet road surface.
Wire stands.
To increase the visibility of highway flares and minimize the effects of moisture on the burning process, Orion manufactures and sells flares with affixed wire stands. By elevating the flare above ground level, this greatly increases the sighting distance for the flare. By elevating the flare above any water laying on the road surface, this greatly improves the ability of the flare to burn vigorously through extreme conditions while maximizing light output.